Monday, June 24, 2013

How to make windows genuine using cmd in just less then 1 min??

Hello guys..

This is amazing trick i came across for making your windows genuine in less than a minute using command prompt..This trick is tested on windows 7.Follow this simple steps for making your windows genuine.

1) Go to run and type in search cmd and run it as administrator.


2) Type the command SLMGR -REARM


3) And you are done next step you will be asked for restart..Restart your comp and you had make your windows as genuine..


This trick is for windows 7.


Now i will show you


1) Click start and choose run


2) Type regedit in run


3) Now you will be directed to registry editor and now expand  HKEY_LOCAL_MACHINE


4) Now navigate to HKEY_LOCAL_MACHINE\Software\Microsoft\Windows NT\CurrentVersion\WPAEvents   and you will be here as shown
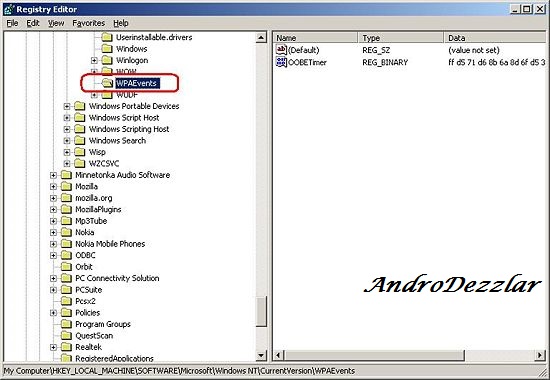


5) Now modify oobe timer (right click on OOBETimer and click modify)


6) In the Edit Binary Value Window,remove all the data value from the data box. Click ok and exit the registry editor.


7) Now go back to run and type %systemroot%\System32\oobe\msoobe.exe /a


8) Now in the Acitivate Window Wizard,chooose the second option.It should be " Yes,I want to telephone a customer service representative to activate Windows."  Click on next.


9) Click on Change Product key


10) Enter your genuine key in the New Key box and click on Update.


11) Check whether your Windows XP is genuine (optional). Type the following command in Run without quotation marks: "oobe/msoobe /a".


If a box appears saying “Windows is already activated," it means your Windows XP is genuine.


Thursday, June 20, 2013

How To Bypass/Disable Pattern Unlock On Android via ADB Commands


[Image: evo-4g-lte-unlock-bootloader-root-regawm...120612.jpg]
  • Pattern unlock is one of the many device protection mechanisms available to Android users, and there are quite a lot of people out there who actually rely on said method to secure their devices from unauthorized access.
  • The problem, however, arises in case you forget the pattern that you set to unlock the device. Worse yet, there could be a situation where your friend may have tried to play a prank on you by setting a pattern lock that you are completely unaware of. Past the break, we’ll be taking a closer look at two solutions in detail.


[Image: sun1.jpg]

  • First things first, and you must have good knowhow of installation and use of ADB.
  • To toggle USB Debugging on Android 4.0 and higher, navigate to the Developer options on the general settings screen. On non-ICS devices, said option can be found by navigating to the Settings > Applications > Development screen.
  • Provided all prerequisites are in place, here’s what you need to do in order to nullify pattern unlock on your Android:

Method 1

  • Connect your device with the computer via USB cable
  • Open Command Prompt and key in the exact code as displayed below:


Quote:


adb shell
cd /data/data/com.android.providers.settings/databases
sqlite3 settings.db
update system set value=0 where name='lock_pattern_autolock';
update system set value=0 where name='lockscreen.lockedoutpermanently';
.quit
  • Reboot your device
  • You may now unlock your device providing whatever pattern you like
[Image: Bypass-Android-Pattern-Unlock1-PC.jpg]

Method 2:

  • If the above method doesn’t work, try using the following code instead:
  • adb shell rm /data/system/gesture.key
[Image: Bypass-Android-Pattern-Unlock2-PC.jpg]
After rebooting, unlock your device using ay preferred pattern.
 As evident from the above, neither method disables the pattern unlock. Instead, they just nullify the pattern order on the lock screen.

Both methods have successfully been tested using a combination of HTC Desire Z (running CyanogenMod 7.2) and Windows 7 (64-bit Edition), and a good thing about these solutions is that they work independent of, as well as in tandem with, each other, so no harm in deploying them both simultaneously. Once you regain access in to the OS, head over to the system security settings, reselect your preferred unlock method, and you’re good to go.

Special Note: The purpose of this guide is to help users with employing an effective pattern unlock bypass solution only on their own devices, instead of using it for malicious (read: unethical) purposes. On the other hand, it begets the need to keep USB Debugging disabled on your device if and when not required in order to be on the safe side.


Monday, November 5, 2012

કોમ્પ્યુટરની સ્પીડ ધીમી પડી ગઇ છે, તો અજમાવી જુઓ આ ઉપાયો

કોમ્પ્યુટર ગમે તેટલું નવું, આધુનિક, બ્રાન્ડેડ અને મોંઘુ હોય, થોડા સમય પછી તે ધીમું થઇ જાય છે. તમે તેની હાર્ડ ડિસ્કને ફોર્મેટ કરી દો છો, વિન્ડોઝને ફરી ઇન્સ્ટોલ કરો છો અને ફરી તે ઝડપ પકડી લે છે. પણ બે-ત્રણ મહિના પછી ફરી પરિસ્થિતિ એની એ જ. પણ સાવધાની સ્વરૂપનાં કેટલાક પગલા લઇને તમે કોમ્પ્યુટરની ઝડપને જાળવી રાખી શકો છો.

બહુ વધારે સોફ્ટવેર ઇન્સ્ટોલ કરવા કોમ્પ્યુટરનાં ધીમા પડવાનાં સામાન્ય કારણોમાંથી એક છે. તેની સાથે જ મોટી સંખ્યામાં ટેમ્પરરી ફાઇલો કે સિસ્ટમ ફાઇલો હાર્ડ ડિસ્કમાં જમા થવાથી પણ કોમ્પ્યુટરની સ્પીડ ધીમી પડી જાય છે. આ ફાઇલો સોફ્ટવેરોનાં ઇન્સ્ટોલેશનની સાથે સાથે ઇન્ટરનેટ સર્ફિંગને કારણે પણ બની જાય છે. વાયરસ, સ્પાયવેર, એડવેર જેવા એપ્લિકેશન અને માલવેર પણ તેમાં મોટી ભૂમિકા ભજવે છે. સાસર જેવા વાયરસ તો તેને એટલું ધીમું કરી શકે છે કે તમે માઉસ પણ ન હલાવી શકો. હાર્ડ ડિસ્કમાં તકલીફ સર્જાવાથી પણ કોમ્પ્યુટર પર કામની સ્પીડ ઘટી જાય છે.
કોમ્પ્યુટરની સ્પીડ ધીમી પડી ગઇ છે, તો અજમાવી જુઓ આ ઉપાયો

જો તમને તમારા કોમ્પ્યુટરની સ્પીડને વરસો વરસ સુધી ટકાવી રાખવા માગો છો તો આ બાબતોનું ધ્યાન રાખો.


1.પોતાની જાતે બનનારી ટેમ્પરરી ફાઇલો (ટેમ્પ)ને કોમ્પ્યુટરમાં સર્ચ કરીને ડિલીટ કરી નાંખો. આ માટે તમે આ પગલાને અનુસરોઃ Internet explorer-Tools-Browsinghistory-Delete.

2.રિસાઇકલ બિન ભરેલી હોય તો તેને ખાલી કરી દો. હાર્ડ ડિસ્ક વધારે ભરાઇ ગઇ હોય તો બિનજરૂરી ફાઇલોને હટાવીને તેમાં ઓછામાં ઓછી ચોથા ભાગની જગ્યા ખાલી રાખો.

3.નોર્ટન, મેકેફી, કેસ્પરસ્કી, એવીજી (મફતમાં ઉપલબ્ધ) માંથી કોઇ પણ સારું એન્ટીવાયરસ ઇન્સ્ટોલ કરો અને પોતાનાં કોમ્પ્યુટરને વાયરસથી બચાવો. આ જ રીતે સ્પાયવેરને હટાવવા માટે 'સ્પાયવેર સર્ચ એન્ડ ડિસ્ટ્રોય' સોફ્ટવેરનો ઉપયોગ કરો

4.હાર્ડ ડિસ્કમાં રહેલા ડેટાને ક્રમવાર જમા કરવા માટે (ડિફ્રેગમેન્ટ) તમે આ સ્ટેપ્સને અનુસરોઃ My computer-Local disk-Right click-Properties-Tools-Defragment now.

5.કન્ટ્રોલ પેનલમાં Add-remove programs દ્વારા એવા બધા સોફ્ટવેરને હટાવી દો, જેમની તમને હવે જરૂર નથી. બહુ ઓછા ઉપયોગમાં આવતા સોફ્ટવેરને પણ તમે હટાવી શકો છો.

6.કોમ્પ્યુટરમાં બધા સોફ્ટવેર સાથે સંબંધિત સૂચના એક જગ્યાએ આવે છે, જેને રજિસ્ટ્રી કહેવાય છે. રજિસ્ટ્રીને સાફ કરવા માટે કોઇ ફ્રીવેર રજિસ્ટ્રી ક્લીનરનો ઉપયોગ કરો, જેથી ત્યાં હટાવાયેલા સોફ્ટવેરનો બિનજરૂરી ડેટા પડ્યો ન રહે.

7.જો કોમ્પ્યુટરમાં રેમ ઓછી છે, તો તેને વધારી દો. એક જીબીની રેમ સારી માનવામાં આવે છે. જો તમે હેવી સોફ્ટવેરનો ઉપયોગ કરો છો, તો રેમને બે જીબીની કરાવી લો. સ્ટાર્ટ અપ શ્રેણીમાં બાટ ડિફોલ્ટ શરૂ થનારા સોફ્ટવેરની સંખ્યાને મર્યાદિત કરી દો. આ માટે કન્ટ્રોલ પેનલ, ટાસ્કબાર એન્ડ સ્ટાર્ટ મેનુ કસ્ટમાઇઝ વિકલ્પોનો પ્રયોગ કરો

8.મારા કોમ્પ્યુટરમાં વરચ્યુઅલ મેમરીનું સેટિંગ જુઓ. તેના માટે કન્ટ્રોલ પેનલમાં System-advanced-performance-settings-virtual memory પર જાઓ. ચેન્જ બટન દબાવીને વરચ્યુઅલ મેમરીનો આકાર મોટો કરી દો. આ મેમરીનો ઉપયોગ રેમનો સંપૂર્ણપણે ઉપયોગ થઇ ગયા પછી વિકલ્પ તરીકે થાય છે
 
 
.
 

Friday, August 10, 2012

Limitation of Global Positioning System(GPS)


  • GPS is extremely versatile in the earthmoving industry but it does have its limitations.
  • GPS satellite signals can only be received in a non obstructed view of the sky with the exception of clouds.
  • If a contractor wanted to perform grade work in preparation for a concrete floor within a building for example, the roof would block the view to the GPS satellites preventing the system from working. Working too close to a structure can also obstruct the machine's view of the sky creating dead zones.
  • High-voltage power-lines can also create dead zones when working underneath them.
  • GPS satellite coverage can also be weaker during certain parts of the day lowering the amount of satellites the machine's system can use.
  • This all depends on the geographical location and time of day. Improvements in GPS technology and the addition of GLONASS (Russian GNSS Satellites) satellites have reduced this issue.
  • As mentioned earlier, in order to increase the overall accuracy of GPS you have to purchase and use a base station which adds additional cost.

Tuesday, August 7, 2012

How to Format Windows 7

Windows 7 is far better than previous windows versions (XP and Vista). The install process is plain simple and easy to follow. Big Bravo! for Microsoft for this. Now, just follow these steps and you will install windows 7 in no time
You can Install Windows 7 via DVD Disk you’ve purchased or with bootable USB.
This post explains installing windows 7 with dvd disk.
- 31 steps total, every step is screen-captured

First, insert your Windows 7 Boot Disk into your dvd drive and reboot your PC
While the PC is rebooting, you will be prompted ” Press any key to boot from CD…” Just press any key here

After you press a key, windows will load installation files.
Windows 7 setup will start
Select your language, time and currency format and keyboard input (US)
Click Install Now to proceed
Setup will load for a min or two
If you do, select I accept the license terms and click Next
If you are upgrading from Windows Vista select Upgrade, if you had Windows XP you have to select Custom (Advanced). Upgrade from Windows XP to Windows 7 is not available. Click Custom (Advanced)
Select the Partition where you want to install Windows 7 and click Next. You will need at least 5716mb free space.
If you don’t have enough free space to Install Windows 7, you will receive the following warning
If that’s the case, you will need to format the partition where you previously had Operating System installed. WARNING: Formatting a partition will erase all existing data on the partition, proceed only if you have backed up all your files!
If you want to format the partition, go to Drive options and format the partition where you want to install windows 7. Again, do this only if you have backed up your documents/files!
click format and then yes
After you press Next, Windows 7 Installation will begin. Approximately takes about 30 min to 1 hour to finish, depending on your computer speed.
After half an hour, setup is complete and windows 7 installation is almost finished. Few more minutes
Now your computer will reboot, since the Windows 7 DVD boot disk is still in the drive, the message press any key to boot from DVD will appear. We already did that, so this time DO NOT press anything. Just wait 5 sec and your PC will continue booting and finish installing your operating system.
Windows will continue booting and installing, almost there!
Finally! Insert your name (this will be your windows username)
If you want to, insert password for your computer. ( Hey….you won’t forget it, right? :) )
Insert your Windows 7 product key and press Next
Do you want Microsoft Updates for your new operating system? It is highly recommend you know…! Select use recommended settings
It’s time for Time zone, select yours from the drop down menu
Depending on your location, select the appropriate network location.
If you have more than 1 computer, type homegroup password for sharing files. Make sure to remember it
Windows is finalizing your settings
Can you see the finish line ? Yup, we’re there
That’s it. Now insert your computer manufacturer drivers CD and install drivers. Also FYI, Windows 7 has great driver support, go to Start –> Control Panel –> Select View By = Small Icons –> Click Windows Update
Check for updates and click on optional updates, to see which drivers windows 7 found for your computer automatically.


Install Windows 7 - Welcome screen